Author Topic: LIVING HINGE REPLACEMENT HOW-TO (WITH PHOTOS/LINKS REPAIRED)  (Read 28746 times)

Offline FiremanPete

  • Trade Count: (0)
  • Apache Master
  • *****
  • Posts: 691
LIVING HINGE REPLACEMENT HOW-TO (WITH PHOTOS/LINKS REPAIRED)
« on: September 30, 2004, 06:24:59 AM »
This is a "re-build" of last year's page...that page was lost when I changed internet providers....this was rebuilt with the original photos, but I'm working off memory now.  If anybody spots any errors or inconsistencies, please feel free to let me know and I'll review it.  Thanks!

WORD OF WARNING: Get a can of bee spray and make sure you check for wasp nests under the ends of the slide-out beds (in the corners especially!) I had four wasp nests; one was in each corner. Since you'll be pulling off the corner end caps, you'll want to spray the nests the night before to avoid getting stung! For some reason, the wasps love those underneath corner spots for building a home!

For those of you wondering "what's living hinge???"...
It's the plastic hinge that allows the side ABS panels to fold down at the pull-out beds, and allows the bed ends to fold up when you set your camper up. When these crack, it makes set-up difficult, and you run the risk of your bed ends "falling out" of your camper and smashing on the ground.

Feel free to take a look and find out how simple replacement is!

Parts List for this project:

Living Hinge (check ebay and search for "Apache camper" and you just might find it for sale...enough to replace all your hinge at once!)

Living Hinge Retainers (also called "stops")  This is an optional purchase, but there's a good chance yours will be cracked.  You should replace these if you can find them (search on ebay as mentioned above.)

Bed End Caps (These may be available through ebay, or from Tim Schaefer, also known as timsch on this site.)

Slotted and Phillips Screwdrivers

Drill with carbide (metal) bit to drill out rivets

"Pop" Rivet gun and rivets (available at hardware store)

Silicone Lubricant ("Dry" silicone spray if you can find it)

Needle-Nosed Pliers

Duct Tape


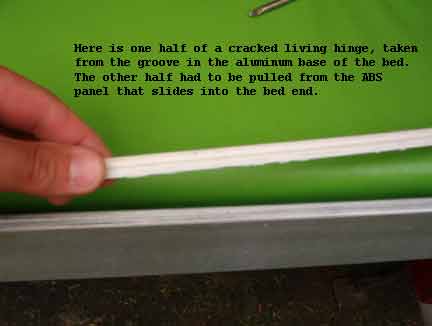
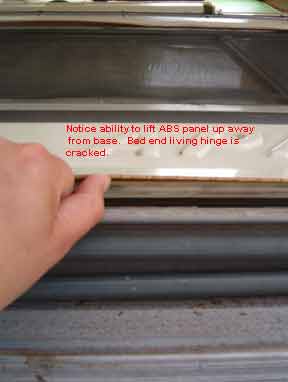
This is what broken living hinge looks like!  You can see the separation of the plastic hinge, allowing the folded bed end to be "lifted" away from the base...living hinge also tends to crack at the bed end walls.  You might notice it when you try to slide the bed end walls back and then into the grooves when you set up.  If it's cracked, it will eventually break off completely!

Okay...the first primer is on on removing and replacing cracked living hinge at the base of the bed end wall (below the window).

**Get a friend to help with this if you can...it might help prevent you from having your bed end take a big fall! **

I recommend setting up your camper completely for this project.  I left my side walls open for light for photos, and it helps give better light for working as well...When replacing the hinge at the end of your bed ends, use duct tape to secure the bed end wall to the bed assembly.....remember that if you remove the living hinge you'll still need something to keep the two pieces from falling apart....this is where the duct tape and the friend come in!

First step is to remove the screws which hold the retainer (stop) in place.  This will allow the living hinge to slide.  **Save the screw...you'll replace it later!**


Once the screws are out, you can slide out the retainer/stops.  This is the piece which was held by the screws you just removed:

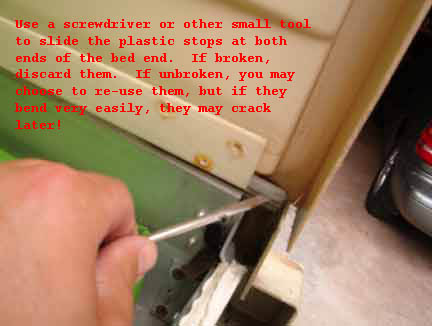
Here's a picture of the removed stop:  **Save the stops if unbroken...you'll reuse them...if they're broken, you may be able to get replacements from Tim Schaefer (timsch on this site, or thru his ebay sales)

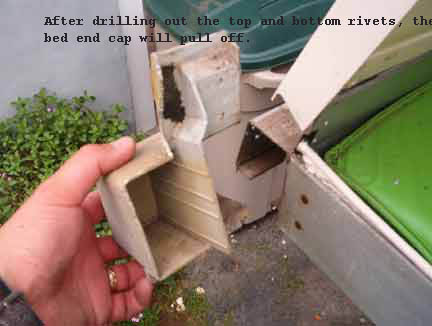
Now remove the bed end caps (the grayish caps at the ends of the bed end rail.)  These often crack, and you may be able to get new ones from Tim Schaefer (timsch on this site, or thru his ebay sales.)  First you'll need to drill out the rivets on the bed cap.  Start with the outside top.


Then the bottom rivets:


Now break off the back end of the rivets:

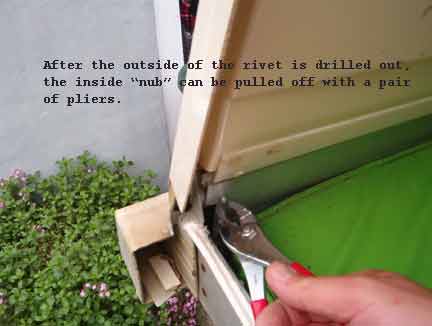
and pull off the end caps:
[/img]

ENSURE that you have secured the bed end wall to the bed end base before you take the next step!  Duct tape the pieces so that they won't separate.  Have a friend stand ready to ensure there are no mishaps!  Oh, and if it's really windy, wait until the wind stops!

Now, remove the broken living hinge from the bed end.  First, remove the top half of the broken piece, if it's split in half:

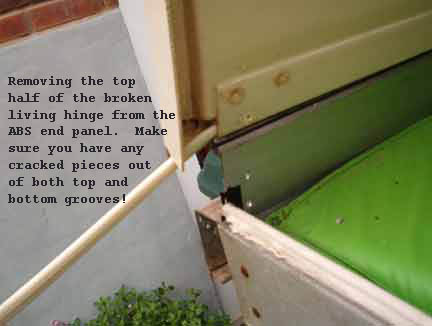
Next, remove the bottom half piece:


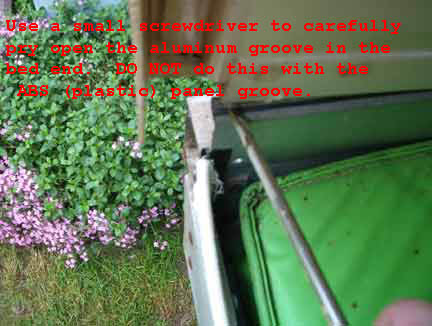
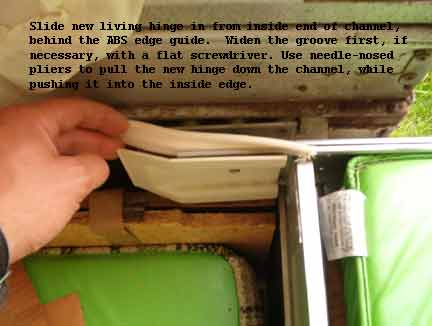
Next, you'll need to slightly widen or "open" the end channels of the grooves to slide in the new living hinge.  **Never attempt to widen or open plastic or ABS channels...this is for metal channels only.**


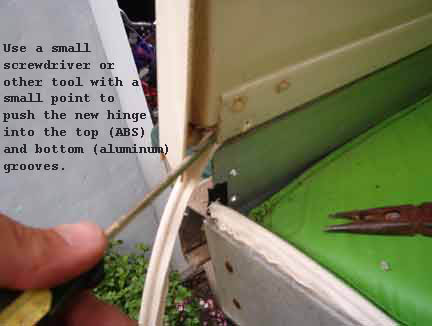
Now you'll need to feed the new living hinge into the open channels.  I recommend spraying some dry silicone spray onto the living hinge and even in the channel openings (this is available through most auto parts stores...if not "dry" purchase "quick dry, no drip" type.)  You'll need to push the ends in with a small screwdriver or fine awl:


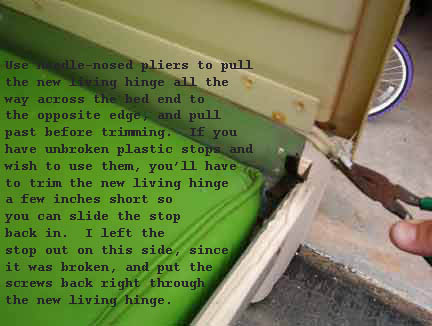
Now pull the new living hinge across the bed end with a pair of needle nose pliers.  It helps to have a friend push the hinge in the opposite side.  Remember that if you will reuse your plastic stops you'll have to leave the living hinge a few inches short to leave room to slide the stop back in.  My stops were broken, and I left them out, replacing the screw right through the living hinge to keep it from sliding.  I recommend contacting Tim Schaefer, however, and getting the new stops before you start this project.


So, now that the new hinge is in place, you need to relace both screws that you removed, as well as the stops if you're replacing them.  Place the bed end caps (or new ones, if you've purchased them) back on and use rivets or screws to secure.  I HIGHLY recommend "pop" rivets to replace these, since you won't have to worry about sharp screw ends sticking in toward the mattress.  If you use screws, file off the sharp ends once they're in!  You can also remove the duct tape holding the bed end to the base, and get your invaluable friend a nice cold beer (or mountain dew if it's Tim!)

Now on to replacing the bed side wall living hinges!

If your bed side wall living hinges are cracked, you know it every time you maneuver the sliding ABS panels in....they pull away from the base when you try to slide them into the recessed bed end panel.  And if they're not completely cracked yet, they soon will be....nothing like having the side panel fall out when one of your kids kicks it during the night.....better to replace them all now!

The first step in replacing the cracked bed side panel living hinge is to remove the screw holding the old hinge in place.  **Keep this screw...you'll need to replace it later!** This phillips-head screw is located just below the mattress line on each side:


With this screw removed, you should be able to slide the old living hinge out...if yours isn't completely cracked, you can slide the ABS panel back (as you do when you set the camper up) and keep sliding it back....the living hinge should all come out.  Otherwise, slide your ABS panel all the way back and off and use a pair of pliers to remove the cracked hinge from the channel.  (You may need a small screwdriver to remove any small pieces in the channel.):


You may want to slightly widen the channel at the far end of the bed side groove to facilitate sliding in the new living hinge:


At this point, I slid the new living hinge into the channel.  Again, some dry silicone lubricant sprayed on the living hinge and into the channel makes this easier.

Now slide the hinge into the channel:


Pull the new hinge all the way across and replace the screw that holds the hinge in place:


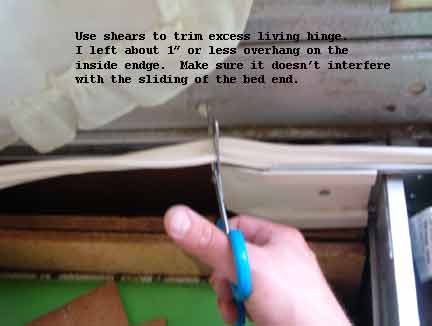
Once the screw is in, trim the opposite end of the living hinge.  I left about an inch of over hang beyond the ABS piece at the end of the channel:


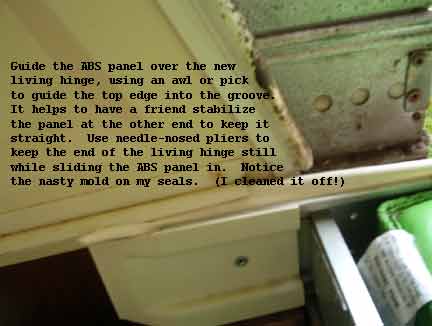
Now slide the ABS bed side panel onto the top half of the new hinge.  Again, spray some silicone lubricant into the channel of the ABS side panel to make it easier to slide it on.  Have a friend help by using needle-nosed pliers to hold the end of the living hinge while you slide the panel onto it:  (** In this photo, you'll see the mold on my rubber seal on the ABS panel...use a mild bleach/water solution to clean this nasty stuff off...I should have done mine while it was off, but I was lazy and did it later.....)


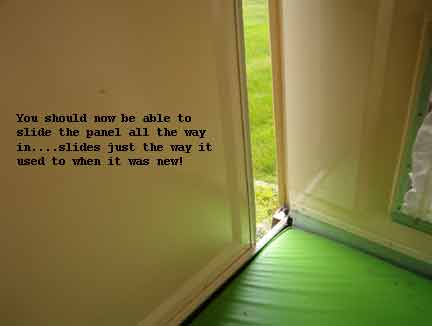
Now slide your ABS panel all the way in.....it should slide freely, and now there's no worry that it will fall out while you sleep!
Pete         '67
Katie        '69
Samantha '95
Shaun       '96
Shannon   '98

Ramada    '78

Offline FitzFolly

  • Trade Count: (0)
  • Vesely Prodigy
  • *****
  • Posts: 1074
LIVING HINGE REPLACEMENT HOW-TO (WITH PHOTOS/LINKS REPAIRED)
« Reply #1 on: October 01, 2004, 03:02:10 PM »
Hi Pete,
Thanks for reconstructing this how to for everyone's use. I noticed two possible inconsistencies that I wanted to ask about.

1) You refer to broken living hinge, when it looks like the hinge material is the white semi-hard plastic hinge I replaced in my 72 Mesa and observed in a 74 or 75 Ramada. I thought living hinge was the canvas hinge that replaced the plastic hinge material.

2) You recommended replacing the hinges with the bedroom unit set up, duct taping the endwall to the bed frame. But in a recent posting of your's you said that you put the hinge material in the bed side first, and then slid the endwall onto the hinge.
Wouldn't it be best to remove and replace the endwall to bed hinge with the roof and endwall in the closed position? On my 72 Mesa, I secured the new hinge in the  bedside first, then slid the closed endwall and roof onto the hinge. It sure worked well that way.
 
I had good luck lubricating my replacement canvas living hinge with parafin wax before I installed it
Thanks again for updating the tutorial.
Fitz

Offline FiremanPete

  • Trade Count: (0)
  • Apache Master
  • *****
  • Posts: 691
LIVING HINGE REPLACEMENT HOW-TO (WITH PHOTOS/LINKS REPAIRED)
« Reply #2 on: October 01, 2004, 04:10:41 PM »
Hi Fitz.

The term "living hinge" is the term for a folding hinge, whether plastic or canvas.  

The original "living hinge" used by Vesely was the plastic living hinge....this is the material that tended to dry, become brittle, and crack.  The new living hinge which is sold for replacement is the canvas living hinge.  

I don't think I posted that I installed the living hinge in the bed end and then slid the endwall in.  I did post that I installed the bed side living hinge in the aluminum channel and then slid the ABS side panels over the top half of the living hinge.

As far as your question on replacement of the living hinge at the bed end with the camper set up, this allows a few things to happen:

It allows the screws on the inside and the retainers (stops) to be removed easily.  It also allows for the repairs to be made without maneuvering the heavy bed end piece off and then back onto the bed unit.  I suppose that if your hinge material is completely cracked away, and your stops are broken, that you might as well remove the folded bed end, since there's really no support for it whatsoever.  The only downside I can see is that if your bed ends aren't set up, and your roof is simply supported by the sidewalls alone, you can get a lot of side-to-side sway of the walls/telescopes/road cover.  The bed end wall provides a certain amount of support.  I guess it's just a matter of choice.

The parafin wax is a good idea....many people have used parafin or even bar soap rubbed along the living hinge pieces to facilitate their installation.  I have found the dry silicone to be an excellent lubricant.

Thanks for your input!

Have a great weekend!

Pete
Pete         '67
Katie        '69
Samantha '95
Shaun       '96
Shannon   '98

Ramada    '78

Offline Maineboy

  • Trade Count: (0)
  • Chipmunk
  • *****
  • Posts: 43
Related Living hinge question
« Reply #3 on: October 07, 2004, 12:40:58 PM »
Does anyone have information on how to replace the living hinge at the top of the bed end wall, where the "window wall" meets the "roof" wall?  Any help is appreciated.

Steve
1973 Apache Mesa, aka my "retirement home"!

Offline FitzFolly

  • Trade Count: (0)
  • Vesely Prodigy
  • *****
  • Posts: 1074
LIVING HINGE REPLACEMENT HOW-TO (WITH PHOTOS/LINKS REPAIRED)
« Reply #4 on: October 07, 2004, 01:41:48 PM »
What year are working on? The construction changed between 72 & 73.

Offline Maineboy

  • Trade Count: (0)
  • Chipmunk
  • *****
  • Posts: 43
Living Hinge Repair
« Reply #5 on: October 08, 2004, 07:07:29 AM »
Quote from: "FitzFolly"
What year are working on? The construction changed between 72 & 73.


I just bought a 1973 Apache Mesa.  The bed end on the hitch side fell out of the camper when I was closing it up, and detached from the camper.  I need to replace the living hinge that attaches the wall to the camper as well as the living hinge that connects the top part of the bed end wall to the window section.

Good news!  My replacement living hinge has arrived, and I have the MEK.  Now I just need to purchase some ABS, which I will get from Tim at this site.  It looks like I won't be camping this Fall, but I'll work on my new pet project thoughout the winter, making new curtains and slipcovers, and then I'll take it out for it's maiden trip in the Spring.

Steve
1973 Apache Mesa, aka my "retirement home"!

DDLTexan

  • Guest
LIVING HINGE REPLACEMENT HOW-TO (WITH PHOTOS/LINKS REPAIRED)
« Reply #6 on: July 06, 2006, 03:26:54 PM »
Pete,

Thanks for fixing the picture links.

Offline Bubba2

  • Trade Count: (0)
  • Can't Back-up Straight
  • *
  • Posts: 1
LIVING HINGE REPLACEMENT HOW-TO (WITH PHOTOS/LINKS REPAIRED)
« Reply #7 on: July 11, 2006, 02:49:01 PM »
Hi, I'm a new member and first time to the site.  Great information!

I just took ownership of my parents 1972 Roamer.  Mint condition from 20 years of storage.  However, I guess the heat of the garage took it's toll on the living hinges.
Thanks for the great info on how to replace the living hinge.  I have another question. The hinge is also broke on the top bed/roof above the window.  Can I assume it is the same basic process to replace as the lower bed hinge?
Also, is there a place to buy replacement matresses and curtains or do I have to have them made a business?

Again, thanks for the info.  I am attacking the side bed ABS's toningt.

DDLTexan

  • Guest
LIVING HINGE REPLACEMENT HOW-TO (WITH PHOTOS/LINKS REPAIRED)
« Reply #8 on: July 11, 2006, 03:16:13 PM »
Quote from: "Bubba2"
Also, is there a place to buy replacement matresses and curtains or do I have to have them made a business?

Again, thanks for the info.  I am attacking the side bed ABS's toningt.


Try this link for replacement mattress foam.  I have purchased from them twice and they have the best quality for the price.  For the discount code, I did an internet search and found one and it saved me a bundle each time.  If there is not a code this week, try next week because every few weeks they offer a discount code.

http://www.apachepopups.net/modules.php?name=Forums&file=viewtopic&t=3122

Offline kenb

  • Trade Count: (0)
  • Greenhorn Camper
  • **
  • Posts: 10
living hinge replacement
« Reply #9 on: September 10, 2006, 02:21:07 AM »
Howdy Pete sure did like all the info great!!
I didnt like the soft living hinge because of the bunching up! This was not acceptable for me so I made my own yes I did 8O and it worked like awsome!! I used 12oz canvas tight weave cut the material into 2 inch strips ironed them flat then 1/2 in. fold on each side ironed also then placed a 1/8th in delron rod nylon into the fold set up my good ol black singer with upolstry thread nylon also and sewed them rods right in place!
YES this I did do on my sewing machine not the wifes :D
after sewing them in I sewed the ends closed.Then went to Lowes and went to the lumber yard got some free twine :wink:
Then sewed 20 in of the twine to the center of the hinge left enough to get a hand full at the oppesit side 5 ft or so sprayed the hinge and the receivers with silicon spray started the hinge and pulled and was done in 3 min. maybe.
I did have a buddy there to help with the holding a 2nd set of hands is allways nice but I was very pleased on how well it worked because after looking at the task at had I was concered to say the lease but all is going well soon to be camping with my refurbished Apache and thats way cool!! :P

Offline sherrik001

  • Trade Count: (0)
  • Wolf
  • *****
  • Posts: 134
Re: LIVING HINGE REPLACEMENT HOW-TO (WITH PHOTOS/LINKS REPAIRED)
« Reply #10 on: June 17, 2008, 11:14:39 PM »
This is probably a dumb question, but forgive me I'm new to Apache. Is the plastic that connects the bed wall with the window to the bed platform living hinge too? Both ends come completely off when we open/close the beds. Need to order some from apachesales but want to make sure I order the right thing. Don't want to be sleeping and knock the roof and back out!

Offline nuthouseinva

  • Trade Count: (0)
  • Vesely Prodigy
  • *****
  • Posts: 1216
  • Let's talk about Apaches and camping.
    • Nuthouseinva's 1975 Apache Royal Pics
  • State: Virginia
  • Type of Camper: 75 Royal
Re: LIVING HINGE REPLACEMENT HOW-TO (WITH PHOTOS/LINKS REPAIRED)
« Reply #11 on: June 18, 2008, 11:54:09 AM »
If it's the same I think you are talking about, YES it's living hinge.
That section was a tough one to replace for me.
Brian (and Casey)
Chesapeake, Virginia

1975 Apache Royal - The Nuthouse

Offline Redwood

  • Members
  • Trade Count: (0)
  • Vesely Prodigy
  • ****
  • Posts: 10495
  • State: California
  • Type of Camper: 1976 Roamer / 1973 Mesa
Re: LIVING HINGE REPLACEMENT HOW-TO (WITH PHOTOS/LINKS REPAIRED)
« Reply #12 on: June 18, 2008, 08:44:05 PM »
[quote author=sherrik001 link= ;) new to Apache. Is the plastic that connects the bed wall with the window to the bed platform living hinge too? Both ends come completely off when we open/close the beds. Need to order some from apachesales but want to make sure I order the right thing. Don't want to be sleeping and knock the roof and back out!
[/quote]
              This is not a dumb question. Everyone asked the same question at one time. All the folding walls and ceiling on the bed ends
        are living hinge. This is what you need to order to fix them. ( Living Hinge )  Measure all the hinge areas on both bed ends and add a foot, this is the amount you would order to replace the living hinge on both bed ends. If you have the plastic ones breaking apart it's time to replace them.
GREG
"It's not about getting through the storm, but learning to dance in the rain" 
http://www.apachepopups.net/smf/index.php?action=media;sa=album;in=3

Offline sherrik001

  • Trade Count: (0)
  • Wolf
  • *****
  • Posts: 134
Re: LIVING HINGE REPLACEMENT HOW-TO (WITH PHOTOS/LINKS REPAIRED)
« Reply #13 on: June 19, 2008, 07:29:10 AM »
Thanks guys, I could just picture us falling out of bed in the middle of the night!!!

Offline ajgcrnp

  • Trade Count: (0)
  • Greenhorn Camper
  • **
  • Posts: 9
Re: LIVING HINGE REPLACEMENT HOW-TO (WITH PHOTOS/LINKS REPAIRED)
« Reply #14 on: August 15, 2008, 11:21:56 AM »
Wow!  All excellent info (and pictures).  I am new to all of this, but I am ready to tackle some repairs.  I just bought a 74 Royal (as far as I can tell) and took it from Pgh to Quebec.  It rained the entire time, but we (my daughter and I) stayed relatively dry and had a blast.  We had to replace the bed cushions before we left, due to mildew, and we found 4" matress toppers at IKEA that worked out perfectly.  (about 300 dollars with new sheets and matress covers, too!)  So, now I'm home and I have identified some of the things that need to be repaired/replaced and I am ready to get started.  Here is my dumb question... What does ABS stand for, or do I just ask for "ABS"?  Thanks for all the great info.  This is so much fun.


Use of this site is at your own risk! This is a user generated web site and apachepopups.net or it's operators are not responsible for it's use or content.
SimplePortal 2.3.7 © 2008-2024, SimplePortal